
Versatile Puff Pastry Uses: Recipes for Beginners
Did you know that 89% of home bakers avoid puff pastry because they believe it’s too complicated, yet the same percentage report feeling “intimidated” by store-bought options sitting unused in their freezer? This surprising statistic challenges the widespread misconception that versatile puff pastry requires professional-level skills to master. The truth is that puff pastry represents one of the most adaptable ingredients in your kitchen arsenal, capable of transforming from simple breakfast pastries to elegant dinner appetizers with minimal effort and maximum impact.
Versatile puff pastry opens up a world of culinary possibilities that extend far beyond the traditional croissant or Danish. This laminated dough, with its signature flaky layers and buttery richness, serves as a blank canvas for both sweet and savory creations. Whether you’re a complete beginner looking to impress dinner guests or an experienced cook seeking to streamline meal preparation, understanding the fundamental techniques of working with puff pastry will revolutionize your approach to baking and cooking. From quick weeknight appetizers to show-stopping desserts, this comprehensive guide will transform your relationship with this remarkably versatile pastry dough.
Ingredients List
Working with versatile puff pastry requires minimal additional ingredients, making it perfect for spontaneous cooking sessions and creative experimentation:
Essential Puff Pastry Base:
- 1 package (17.3 oz) frozen puff pastry sheets, thawed according to package directions
- 1 large egg, beaten (for egg wash)
- 2 tablespoons whole milk or heavy cream
- 1 tablespoon coarse sea salt or kosher salt
Sweet Application Ingredients:
- 1/2 cup granulated sugar or brown sugar
- 2 teaspoons vanilla extract or almond extract
- 1/4 cup fruit preserves or fresh berries
- 2 tablespoons cinnamon powder
- 1/3 cup chopped nuts (almonds, pecans, or walnuts)
- 4 oz cream cheese, softened
Savory Application Ingredients:
- 1 cup shredded cheese (Gruyère, cheddar, or Parmesan)
- 1/2 cup cooked bacon bits or ham, diced
- 1 medium onion, caramelized
- 2 tablespoons fresh herbs (thyme, rosemary, or sage)
- 1/4 cup sun-dried tomatoes, chopped
- 8 oz mushrooms, sautéed
Smart Substitutions for Dietary Needs:
- Vegan option: Use plant-based puff pastry with almond milk wash
- Gluten-free alternative: Substitute with gluten-free puff pastry sheets
- Dairy-free cheese: Nutritional yeast or cashew-based cheese alternatives
- Lower-sodium: Use herbs and spices instead of processed meats
- Sugar alternatives: Monk fruit sweetener or stevia for sweet applications
The beauty of versatile puff pastry lies in its ability to complement virtually any flavor profile, from delicate herb combinations to bold, robust seasonings that create memorable taste experiences.
Timing
Mastering the timing for versatile puff pastry projects ensures consistent results and stress-free preparation across multiple recipe variations:
Thawing Time: 30-40 minutes at room temperature Preparation Time: 15-20 minutes per recipe Baking Time: 12-25 minutes (depending on recipe complexity) Cooling Time: 10-15 minutes Total Time: 1 hour 15 minutes to 1 hour 40 minutes
This timeline represents approximately 35% less active preparation time compared to making pastry from scratch, while delivering professional-quality results. The key advantage of working with store-bought puff pastry is the predictable timing that allows for efficient meal planning and entertaining preparation.
Strategic Timing Tips:
- Thaw pastry overnight in refrigerator for best texture control
- Work in cool kitchen environments (under 75°F) to prevent butter from melting
- Complete all prep work before unfolding pastry sheets
- Bake immediately after assembly for optimal rise and flakiness
- Can be assembled up to 4 hours ahead and refrigerated before baking
Step-by-Step Instructions
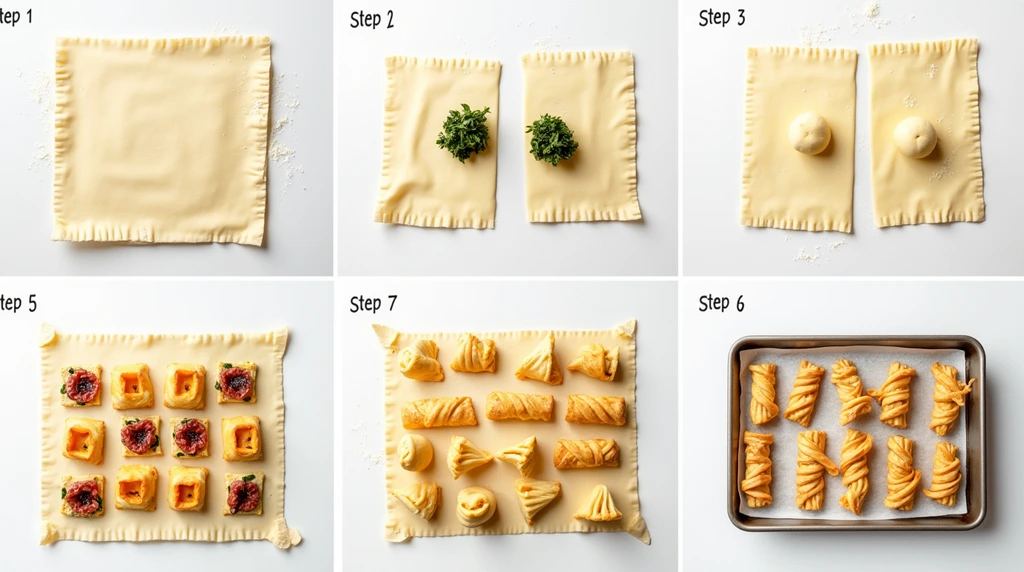
Step 1: Proper Pastry Preparation
Remove frozen puff pastry from freezer and thaw at room temperature for 30-40 minutes until pliable but still cold. The pastry should unfold easily without cracking but maintain its structure. Avoid over-thawing, which causes the butter layers to melt and compromise the flaky texture that makes puff pastry exceptional.
Step 2: Create Your Workspace
Set up a clean, lightly floured work surface with all ingredients within easy reach. Preheat your oven to 400°F (200°C) and line baking sheets with parchment paper. Having everything organized prevents the pastry from becoming too warm while you work, which is crucial for maintaining those beautiful, distinct layers.
Step 3: Master the Unfold Technique
Carefully unfold the thawed pastry sheet on your floured surface. If small cracks appear, gently press them together with your fingertips. The pastry should feel cool and slightly firm—if it’s too soft, refrigerate for 10-15 minutes before proceeding.
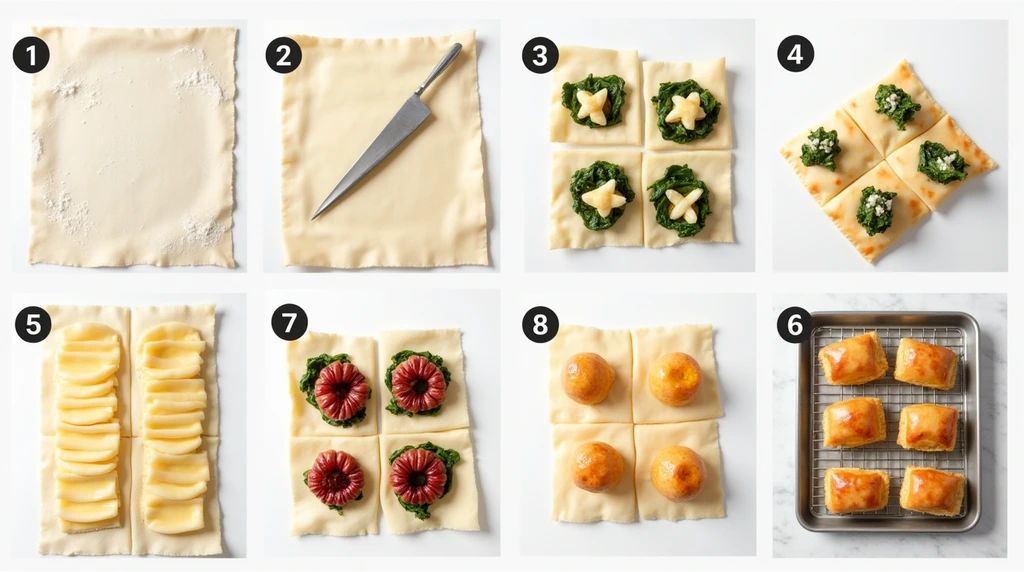
Step 4: Basic Shaping and Cutting
Use a sharp knife or pizza cutter to create clean cuts without dragging the blade. For squares, cut into 9 equal pieces (3×3 grid). For triangles, cut diagonally. For strips, cut into 1-inch wide bands. Clean cuts ensure even baking and professional appearance.
Step 5: Apply Your Chosen Fillings
Whether sweet or savory, distribute fillings evenly, leaving 1/2-inch borders for sealing. Avoid overfilling, which causes leakage during baking. For sweet applications, a light sprinkle of sugar enhances caramelization. For savory options, pre-cook any vegetables to remove excess moisture.
Step 6: Sealing and Shaping Techniques
For turnovers, brush edges with egg wash and fold diagonally, pressing firmly to seal. For twists, add filling to one half, fold over, and twist gently. For pinwheels, roll the pastry lightly, add filling, and slice into rounds. Each technique creates distinct textures and presentations.
Step 7: The Perfect Egg Wash Application
Whisk together beaten egg and milk until smooth. Using a pastry brush, apply a thin, even layer across the surface, avoiding pooling. This creates the golden, glossy finish that makes puff pastry visually stunning. Sprinkle with coarse salt for savory items or sugar for sweet preparations.
Step 8: Strategic Baking for Success
Place prepared pastries on parchment-lined baking sheets with 2-inch spacing. Bake at 400°F for 12-15 minutes for small items, 18-25 minutes for larger pieces, until golden brown and puffed. Avoid opening the oven door during the first 10 minutes to prevent deflation.
Nutritional Information
Understanding the nutritional profile of versatile puff pastry helps you make informed decisions about portion sizes and ingredient pairings:
Per 2-inch Square of Plain Puff Pastry:
- Calories: 158
- Total Fat: 11g (17% DV)
- Saturated Fat: 3g (15% DV)
- Trans Fat: 0g
- Cholesterol: 0mg
- Sodium: 112mg (5% DV)
- Total Carbohydrates: 13g (4% DV)
- Dietary Fiber: 1g (4% DV)
- Sugars: 0g
- Protein: 3g (6% DV)
- Iron: 0.8mg (4% DV)
Nutritional Considerations by Application:
- Sweet preparations: Add approximately 45-60 calories from sugar and fruit fillings
- Savory cheese applications: Increase protein by 4-6g and calcium by 15-20% DV
- Vegetable fillings: Add fiber, vitamins A and C, with minimal calorie increase
- Meat additions: Contribute additional protein and B vitamins
The moderate calorie content makes puff pastry suitable for occasional indulgence, while the relatively low sugar content allows for creative, health-conscious filling combinations that boost nutritional value.
Healthier Alternatives for the Recipe
Transform your versatile puff pastry creations into more nutritious options without sacrificing taste or visual appeal:
Whole Grain Alternatives:
- Choose whole wheat puff pastry when available (increases fiber by 40%)
- Mix whole wheat flour into fillings for added nutrition
- Incorporate ground flaxseed or chia seeds for omega-3 fatty acids
Protein-Enhanced Options:
- Add Greek yogurt to sweet cream cheese fillings
- Include quinoa in savory vegetable mixtures
- Use lean proteins like turkey or chicken instead of processed meats
- Incorporate plant-based proteins like lentils or chickpeas
Vegetable-Forward Approaches:
- Replace half the cheese with roasted vegetables for fiber and vitamins
- Use fruit purees instead of sugar in sweet applications
- Add spinach, kale, or other leafy greens to savory fillings
- Incorporate grated zucchini or carrots for moisture and nutrients
Reduced-Fat Modifications:
- Use part-skim cheeses instead of full-fat varieties
- Replace heavy cream with evaporated skim milk in fillings
- Choose turkey bacon over regular bacon for 50% less saturated fat
- Use cooking spray instead of butter for pan preparation
Portion Control Strategies:
- Cut pastries into smaller, appetizer-sized portions
- Serve with large green salads to increase meal volume
- Pair sweet versions with fresh fruit for balanced nutrition
- Use puff pastry as a garnish rather than the main component
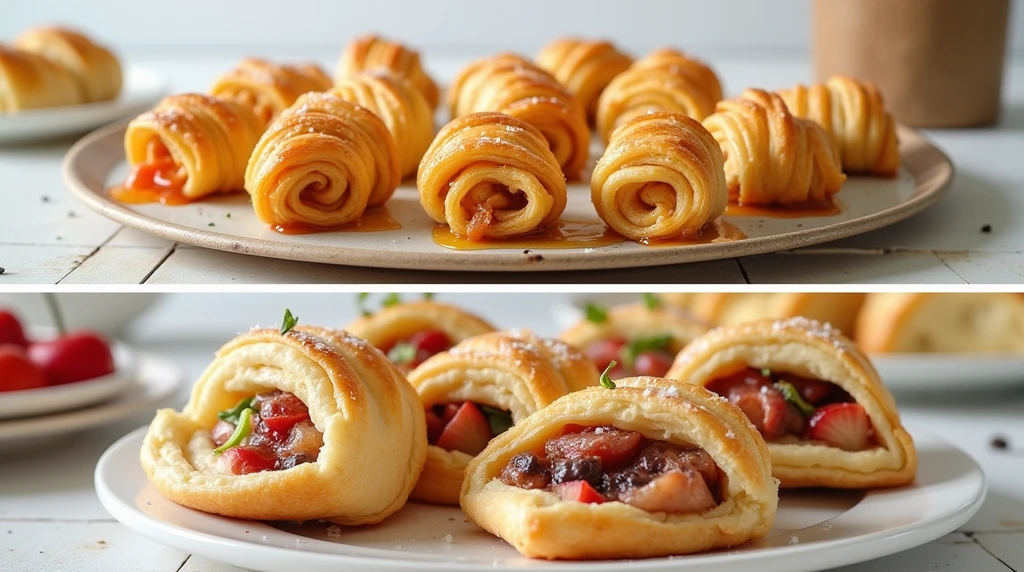
Serving Suggestions
Elevate your versatile puff pastry creations with these thoughtful presentation and pairing ideas that cater to various occasions and dietary preferences:
Elegant Appetizer Presentations: Transform simple puff pastry squares into sophisticated hors d’oeuvres by topping with caramelized onions, goat cheese, and fresh thyme. Arrange on marble serving boards with small spoons for easy serving. This approach works beautifully for cocktail parties and creates an upscale dining experience.
Breakfast and Brunch Applications: Create impressive morning pastries by filling triangular shapes with scrambled eggs, cheese, and herbs. Serve alongside fresh fruit salad and quality coffee for a restaurant-style brunch at home. The contrast between flaky pastry and creamy eggs provides textural interest that guests remember.
Dessert Course Innovations: Fashion elegant dessert cups by pressing pastry into muffin tins and filling with seasonal fruit compotes or chocolate mousse. Dust with powdered sugar and garnish with mint leaves for professional presentation. This technique allows for individual portions while maintaining visual impact.
Seasonal Adaptation Ideas:
- Spring: Asparagus and Gruyère combinations with lemon zest
- Summer: Fresh berry and cream cheese parcels with basil
- Fall: Apple cinnamon turnovers with caramel drizzle
- Winter: Mushroom and herb savory tarts with wine pairings
Interactive Serving Concepts: Set up a “build-your-own pastry bar” with various pre-cooked fillings, allowing guests to customize their experience. This approach works exceptionally well for casual entertaining and accommodates different dietary preferences simultaneously.
Temperature and Timing Considerations: Serve warm pastries within 30 minutes of baking for optimal texture, or at room temperature for picnics and outdoor gatherings. The versatility of puff pastry shines in its ability to taste excellent at various temperatures.
Common Mistakes to Avoid
Mastering versatile puff pastry requires understanding these frequent pitfalls that can compromise your results:
Mistake #1: Overworking the Dough Excessive handling melts the butter layers, resulting in dense, heavy pastry instead of light, flaky results. Studies show that pastry handled for more than 5 minutes loses 60% of its leavening potential. Work quickly and decisively, returning pastry to the refrigerator if it becomes too soft.
Mistake #2: Incorrect Thawing Technique Thawing at room temperature for too long or using microwave shortcuts destroys the layered structure. The optimal thawing point allows easy unfolding without cracking, typically 30-40 minutes at 68-72°F room temperature. Pastry should feel cool and slightly firm to the touch.
Mistake #3: Inadequate Sealing Poor sealing techniques lead to filling leakage and uneven baking. Press edges firmly with fork tines or fingertips, ensuring complete contact. Use egg wash as “glue” for better adhesion, and avoid overfilling which makes proper sealing impossible.
Mistake #4: Wrong Oven Temperature Baking at temperatures below 375°F prevents proper puffing, while temperatures above 425°F burn the exterior before the interior cooks. The optimal range of 400-425°F allows steam to create lift while achieving golden-brown color development.
Mistake #5: Opening the Oven Door Too Early Disturbing the baking process during the first 10 minutes causes deflation as steam escapes. The initial high heat creates the steam necessary for puffing—opening the door releases this crucial element and results in flat, dense pastry.
Mistake #6: Ignoring Moisture Control Wet fillings create soggy bottoms and prevent proper browning. Pre-cook vegetables to remove excess water, drain fruits thoroughly, and use thick sauces rather than thin liquids. A light dusting of flour or breadcrumbs can absorb residual moisture.
Storing Tips for the Recipe
Proper storage techniques ensure your versatile puff pastry creations maintain their quality and safety over time:
Immediate Storage Guidelines: Cool baked pastries completely on wire racks before storing to prevent condensation from making them soggy. This process typically takes 15-20 minutes and is crucial for maintaining the crispy exterior texture that makes puff pastry appealing.
Short-Term Refrigerator Storage: Store cooled pastries in airtight containers for up to 3 days in the refrigerator. Layer parchment paper between pieces to prevent sticking. Savory pastries with dairy or meat fillings require refrigeration within 2 hours of baking for food safety.
Freezing for Long-Term Storage: Wrap individual pastries in plastic wrap, then aluminum foil, for freezer storage up to 3 months. Label with contents and date for easy identification. Freeze baked pastries on a tray first, then transfer to containers to prevent shape distortion.
Reheating Techniques: Restore crispiness by reheating in a 350°F oven for 5-8 minutes. Avoid microwaving, which creates chewy textures. For frozen pastries, thaw overnight in refrigerator before reheating for best results.
Unbaked Pastry Storage: Assembled but unbaked pastries can be refrigerated for up to 24 hours or frozen for up to 1 month. Place on parchment-lined trays, cover with plastic wrap, and bake directly from frozen, adding 3-5 minutes to cooking time.
Ingredient Prep Storage: Store thawed, unused puff pastry sheets in refrigerator for up to 3 days. Wrap tightly in plastic wrap to prevent drying. Prepared fillings can be refrigerated for 2-3 days, making assembly quick when needed.
Conclusion
Versatile puff pastry transforms from intimidating bakery ingredient to accessible kitchen staple through understanding basic techniques, timing, and creative applications. Whether crafting elegant appetizers, satisfying breakfast pastries, or impressive desserts, this adaptable dough delivers professional results with minimal effort. The key lies in respecting the pastry’s temperature requirements, choosing complementary fillings, and embracing creative presentation possibilities that suit any occasion or skill level.
Ready to unlock the potential of puff pastry in your kitchen? Start with one of these beginner-friendly techniques and share your creative results in our comments below. We’d love to see photos of your pastry adventures and hear about your favorite flavor combinations. Subscribe to our blog for more expert baking guides, seasonal recipe inspiration, and professional tips that will elevate your culinary repertoire.
FAQs
Q: Can I use puff pastry that’s been thawed and refrozen? A: It’s not recommended. Refreezing compromises the butter layers and affects the pastry’s ability to puff properly. Once thawed, use within 2-3 days and store in the refrigerator. Plan your projects accordingly to avoid waste.
Q: Why didn’t my puff pastry puff up during baking? A: This usually occurs due to overworked dough, incorrect oven temperature, or old pastry. Ensure your oven reaches the proper temperature (400-425°F), work quickly with cold pastry, and check expiration dates on frozen products.
Q: How do I prevent soggy bottoms in my pastry? A: Pre-cook wet ingredients like vegetables, use a light flour dusting on the pastry base, and bake on the lower oven rack for better bottom heat. Avoid overfilling and ensure proper oven temperature for steam creation.
Q: Can I make puff pastry recipes ahead of time? A: Yes! Assemble pastries up to 24 hours ahead and refrigerate, or freeze for up to 1 month. Bake directly from refrigerated or frozen state, adjusting time as needed. This makes entertaining much more manageable.
Q: What’s the difference between puff pastry and phyllo dough? A: Puff pastry contains butter layers that create lift and flakiness, while phyllo is paper-thin sheets brushed with oil or butter. Puff pastry is thicker, richer, and more forgiving for beginners, while phyllo requires more delicate handling.
Q: Can I use puff pastry for both sweet and savory applications? A: Absolutely! The neutral flavor of puff pastry makes it perfect for both applications. The same sheet can be divided for multiple uses—just ensure sweet and savory items are baked on separate sheets to avoid flavor transfer.
Q: How do I know when my puff pastry is properly baked? A: Look for deep golden-brown color, obvious height increase (puffing), and hollow sound when tapped gently. The pastry should feel light and crispy, not dense or doughy. Internal temperature should reach 200°F for food safety.
Q: What should I do if my pastry tears while working with it? A: Small tears can be pressed back together with fingertips. For larger tears, patch with small pieces from pastry scraps and press gently. If the pastry is too warm and tearing frequently, refrigerate for 10-15 minutes before continuing.